RASPBERRY PI AS VIDEO SOURVILLANCE CAMERA
INTRODUCTION
This is the first of the publications I plan to publish to describe the configuration of a home video surveillance service based on the devices I have on hand:
- a couple of Rasbperry Pi boards (en henceforth rpi) (1 B+ y 2 B models)
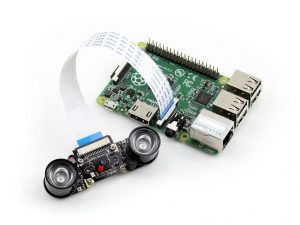
- and a night vision camera module for them (OV5647)
For now we will describe how to configure the Raspberry Pi 1 B + to provide live video.
In future publications:
- we will configure the secondrpi 2 B:
- adding a video surveillance server (zoneminder)
- and connecting a modem to have a to have a alarms mechanism in our phone.
- We will return to the first rpi 1 B+ to install on int an audio server
Once configured, we will have a video surveillance system, accessible from the internet with the following functionalities:
- Motion detection.
- Alarm system and telephone alarm.
- Video recording, continuous and/or through alarms.
If time allows, we will explain how to control devices with the rpi GPIO interface and integrate them into our alarm and automation system:
- Detector sensors:
- CO2.
- temperature and humidity.
- open doors and windows
- Domotics in general, controlling and automating:
- a heating boiler
- Lighting, blinds…
NOTE: The downloads section at the end of this document includes links to all sources and binaries used..
HARDWARE
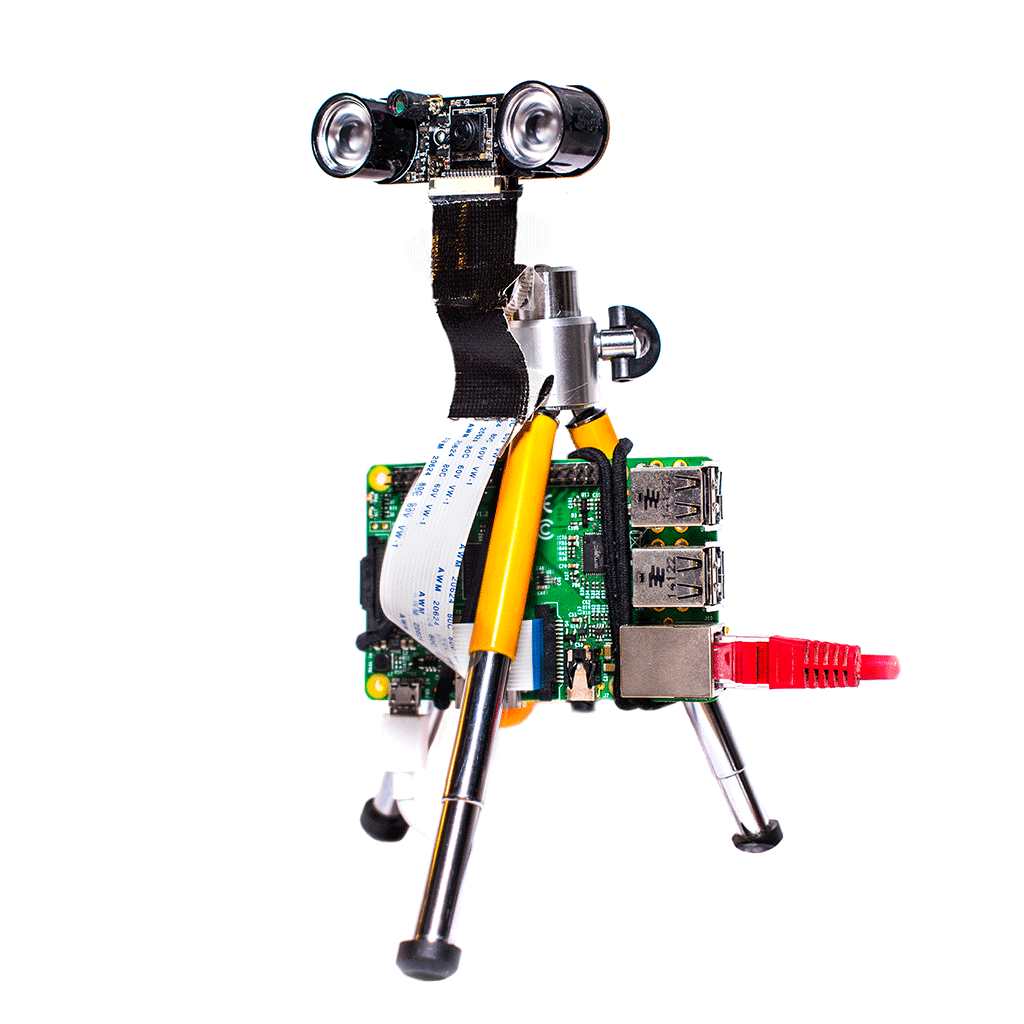
Starting from a RASPBERRY PI B+ and an Omnivision OV5647 night vision camera module, we will build a kind of IP camera.
Going into detail, we’ll describe the configuration of an RTP server (RTSP) coding H.264 (MPEG-4 Part 10) video which will provide live video from the camera, useful as:
- «remote camera» on the video surveillance server (zoneminder).
- Its visualization in any browser or client of video RTP (vlc, mplayer, ffmpeg, …).
ESPECIFICACIONES DE LA CÁMARA
- Raspberry Pi Night Vision Camera, supports all revisions of the Pi
- 5 megapixel OV5647 sensor
- Camera specifications
- CCD size : 1/4inch
- Aperture (F) : 1.8
- Focal Length : 3.6MM (adjustable)
- Diagonal : 75.7 degree
- Sensor best resolution : 1080p
VIDEO SERVICES CONFIGURATION
FFSERVER
FFMPEG: problems with arm6 (raspbian jessie)
We will work with ffserver as video encoder and camera status server.
The binary distributed by jessie seems to be compiled for arm7 processors and is not compatible for the raspberry pi 1 arm6, so it is necessary to compile it.
The execution of lsinfo indicates the architecture and model of the raspberry processor (lines 2 and 9).
$ lscpu
Architecture:          armv6l
Byte Order:            Little Endian
CPU(s):                1
On-line CPU(s) list:   0
Thread(s) per core:    1
Core(s) per socket:    1
Socket(s):             1
Model name:            ARMv6-compatible processor rev 7 (v6l)
CPU max MHz:           700.0000
CPU min MHz:           700.0000
In the downloads section, at the end of this document, are included the binaries I generated ffmpeg-v2.7.2.
FFSERVER: configuracion
Next we show the configuration file (/etc/ffserver.conf) for our encoder.
In this case, lines 13 and 28 ( ACL allow 10.0.0.0 10.255.255.255 ) must be in line with the available network configuration (generally 192.168.0.0 192.168.255.255 )
Lines 19 to 21 allow you to configure frames per second, resolution and bit rate of the video to be encoded.
HTTPPort 8090 HTTPBindAddress 0.0.0.0 MaxClients 10 MaxBandwidth 1000 RTSPPort 8554 RTSPBindAddress 0.0.0.0File /tmp/feed1.ffm FileMaxSize 10M ACL allow localhost ACL allow 10.0.0.0 10.255.255.255 Format rtp Feed feed1.ffm VideoFrameRate 4 VideoSize 600x480 VideoBitRate 320 NoAudio Format status ACL allow localhost ACL allow 10.0.0.0 10.255.255.255
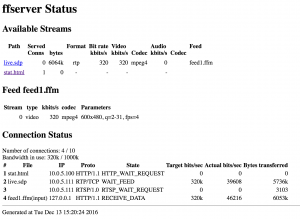
FFSERVER: status checking
Once started (just run ffserver), the status of the encoder is accessible in the URL:
and it must show us something such that:
FFSERVER: automatic starting
For automatic execution at system startup, we will use the supervisory service (installation: sudo apt-get install supervisor ).
We only need to add the following ffserver.conf configuration file in the /etc/supervisor/conf.d/ directory.
[program:ffserver]
command=/usr/local/bin/ffserver
directory=/tmp
autostart=true
autorestart=true
startretries=3
stderr_logfile=/var/log/supervisor/ffserver.err.log
stdout_logfile=/var/log/supervisor/ffserver.out.log
user=pi
FFMPEG: RTSP H264 STREAMING
FFMPEG: «zm_streaming», the streaming script
So far we have ffmpeg encoding the camera video in /tmp/feed1.ffm. Now, using ffmpeg, we restreaming that video stream as rtp h264 with the following python script that we need to copy to /usr/local/bin/zm_streaming:
#! /usr/bin/env python
import subprocess
p1 = subprocess.Popen(["raspivid", "-b", "5000000", "-ex", "night", "-mm", "average", "-op", "150", "-t", "999999999", "-w", "640", "-h", "480", "-fps", "4", "-o", "-cat"], stdout=subprocess.PIPE)
p2 = subprocess.Popen(["ffmpeg", "-i", "-", "-flags", "+global_header", "-vcodec", "copy", "-r", "4", "-an", "http://0.0.0.0:8090/feed1.ffm"], stdin=p1.stdout, stdout=subprocess.PIPE)
p1.stdout.close()  # p1 will receive SIGPIPE if p2 exits
In it, among other parameters, we can modify the video format (width, height and frames per second): “-w”, “640”, “-h”, “480”, “-fps”, “4”.
FFMPEG: auto initialization of the streaming script
Using the supervisor again, we create the following file /etc/supervisor/conf.d/zm_streaming.conf to get an automated start-up of our RTP H.264 streaming service «zm_streaming».
[program:zm_streaming]
command=/usr/local/bin/zm_streaming
directory=/tmp
autostart=true
autorestart=true
startretries=3
stderr_logfile=/var/log/supervisor/zm_streaming.err.log
stdout_logfile=/var/log/supervisor/zm_streaming.out.log
user=pi
THE MOMENT OF TRUTH
STARTING THE VIDEO SERVICES
After a reboot we should have our live video server available.
But living in the distinguished * NIX world, there is nothing more elegant than a test without restart:
  $ sudo supervisorctl start ffserver
  $ sudo supervisorctl start zm_streaming
Supervisor allows us to check the status of the services using the status command:
$ sudo supervisorctl status ffserver
And if all goes well, it will indicate us both as «RUNNING»:
$ sudo supervisorctl status
  ffserver                         RUNNING    pid 651, uptime 5:35:35
  zm_streaming                     RUNNING    pid 656, uptime 5:35:35
As we said previously , we have a web service for Check the status of the service.
PLAYING THE LIVE VIDEO – VLC
We our live video is now available opening in VLC (in File->Open Network – Network tab ) the URL:
PLAYING THE LIVE VIDEO IN BROWSERS
We can play our streaming in browsers adding the following code into ffserver configuration file: /etc/ffserver.conf.
The live video video will be available in:
<Stream live.mjpg>
  Feed feed1.ffm
  Format mpjpeg
  VideoFrameRate 4
  VideoSize 600x480
  VideoBitRate 320
  VideoIntraOnly
  NoAudio
  Strict -1
</Stream>
DOWNLOADS
– Configuration files: zm-v1.0.0.tar.bz2
– Ffmpeg v2.7.2 compiled to arm6: ffmpeg-v2.7.2.tar.bz2